Proven Expertise
Our team brings years of experience in the digital payments industry to provide reliable services.
## Debugbar for Laravel

[](http://choosealicense.com/licenses/mit/)
[](https://packagist.org/packages/barryvdh/laravel-debugbar)
[](https://packagist.org/packages/barryvdh/laravel-debugbar)
[](https://fruitcake.nl/)
This is a package to integrate [PHP Debug Bar](http://phpdebugbar.com/) with Laravel.
It includes a ServiceProvider to register the debugbar and attach it to the output. You can publish assets and configure it through Laravel.
It bootstraps some Collectors to work with Laravel and implements a couple custom DataCollectors, specific for Laravel.
It is configured to display Redirects and (jQuery) Ajax Requests. (Shown in a dropdown)
Read [the documentation](http://phpdebugbar.com/docs/) for more configuration options.
### Note: Use the DebugBar only in development. Do not use Debugbar on publicly accessible websites, as it will leak information from stored requests (by design). It can also slow the application down (because it has to gather data). So when experiencing slowness, try disabling some of the collectors.
This package includes some custom collectors:
- QueryCollector: Show all queries, including binding + timing
- RouteCollector: Show information about the current Route.
- ViewCollector: Show the currently loaded views. (Optionally: display the shared data)
- EventsCollector: Show all events
- LaravelCollector: Show the Laravel version and Environment. (disabled by default)
- SymfonyRequestCollector: replaces the RequestCollector with more information about the request/response
- LogsCollector: Show the latest log entries from the storage logs. (disabled by default)
- FilesCollector: Show the files that are included/required by PHP. (disabled by default)
- ConfigCollector: Display the values from the config files. (disabled by default)
- CacheCollector: Display all cache events. (disabled by default)
Bootstraps the following collectors for Laravel:
- LogCollector: Show all Log messages
- SymfonyMailCollector for Mail
And the default collectors:
- PhpInfoCollector
- MessagesCollector
- TimeDataCollector (With Booting and Application timing)
- MemoryCollector
- ExceptionsCollector
It also provides a facade interface (`Debugbar`) for easy logging Messages, Exceptions and Time
## Installation
Require this package with composer. It is recommended to only require the package for development.
```shell
composer require barryvdh/laravel-debugbar --dev
```
Laravel uses Package Auto-Discovery, so doesn't require you to manually add the ServiceProvider.
The Debugbar will be enabled when `APP_DEBUG` is `true`.
> If you use a catch-all/fallback route, make sure you load the Debugbar ServiceProvider before your own App ServiceProviders.
### Laravel without auto-discovery:
If you don't use auto-discovery, add the ServiceProvider to the providers array in config/app.php
```php
Barryvdh\Debugbar\ServiceProvider::class,
```
If you want to use the facade to log messages, add this to your facades in app.php:
```php
'Debugbar' => Barryvdh\Debugbar\Facades\Debugbar::class,
```
The profiler is enabled by default, if you have APP_DEBUG=true. You can override that in the config (`debugbar.enabled`) or by setting `DEBUGBAR_ENABLED` in your `.env`. See more options in `config/debugbar.php`
You can also set in your config if you want to include/exclude the vendor files also (FontAwesome, Highlight.js and jQuery). If you already use them in your site, set it to false.
You can also only display the js or css vendors, by setting it to 'js' or 'css'. (Highlight.js requires both css + js, so set to `true` for syntax highlighting)
#### Copy the package config to your local config with the publish command:
```shell
php artisan vendor:publish --provider="Barryvdh\Debugbar\ServiceProvider"
```
### Laravel with Octane:
Make sure to add LaravelDebugbar to your flush list in `config/octane.php`.
```php
'flush' => [
\Barryvdh\Debugbar\LaravelDebugbar::class,
],
```
### Lumen:
For Lumen, register a different Provider in `bootstrap/app.php`:
```php
if (env('APP_DEBUG')) {
$app->register(Barryvdh\Debugbar\LumenServiceProvider::class);
}
```
To change the configuration, copy the file to your config folder and enable it:
```php
$app->configure('debugbar');
```
## Usage
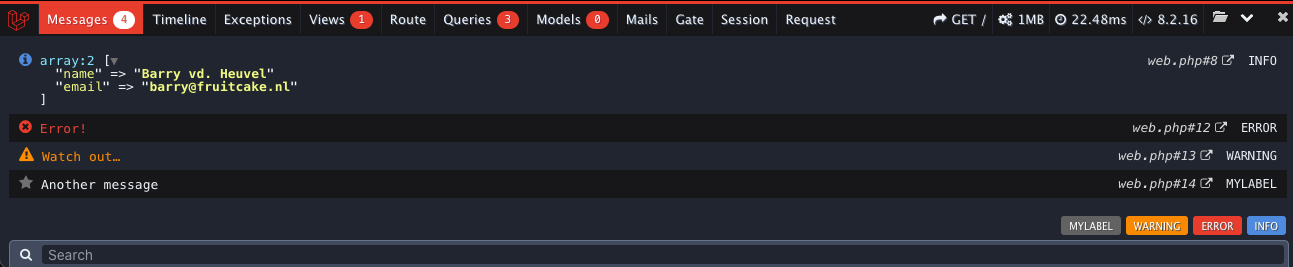
You can now add messages using the Facade (when added), using the PSR-3 levels (debug, info, notice, warning, error, critical, alert, emergency):
```php
Debugbar::info($object);
Debugbar::error('Error!');
Debugbar::warning('Watch out…');
Debugbar::addMessage('Another message', 'mylabel');
```
And start/stop timing:
```php
Debugbar::startMeasure('render','Time for rendering');
Debugbar::stopMeasure('render');
Debugbar::addMeasure('now', LARAVEL_START, microtime(true));
Debugbar::measure('My long operation', function() {
// Do something…
});
```
Or log exceptions:
```php
try {
throw new Exception('foobar');
} catch (Exception $e) {
Debugbar::addThrowable($e);
}
```
There are also helper functions available for the most common calls:
```php
// All arguments will be dumped as a debug message
debug($var1, $someString, $intValue, $object);
// `$collection->debug()` will return the collection and dump it as a debug message. Like `$collection->dump()`
collect([$var1, $someString])->debug();
start_measure('render','Time for rendering');
stop_measure('render');
add_measure('now', LARAVEL_START, microtime(true));
measure('My long operation', function() {
// Do something…
});
```
If you want you can add your own DataCollectors, through the Container or the Facade:
```php
Debugbar::addCollector(new DebugBar\DataCollector\MessagesCollector('my_messages'));
//Or via the App container:
$debugbar = App::make('debugbar');
$debugbar->addCollector(new DebugBar\DataCollector\MessagesCollector('my_messages'));
```
By default, the Debugbar is injected just before `</body>`. If you want to inject the Debugbar yourself,
set the config option 'inject' to false and use the renderer yourself and follow http://phpdebugbar.com/docs/rendering.html
```php
$renderer = Debugbar::getJavascriptRenderer();
```
Note: Not using the auto-inject, will disable the Request information, because that is added After the response.
You can add the default_request datacollector in the config as alternative.
## Enabling/Disabling on run time
You can enable or disable the debugbar during run time.
```php
\Debugbar::enable();
\Debugbar::disable();
```
NB. Once enabled, the collectors are added (and could produce extra overhead), so if you want to use the debugbar in production, disable in the config and only enable when needed.
## Storage
Debugbar remembers previous requests, which you can view using the Browse button on the right. This will only work if you enable `debugbar.storage.open` in the config.
Make sure you only do this on local development, because otherwise other people will be able to view previous requests.
In general, Debugbar should only be used locally or at least restricted by IP.
It's possible to pass a callback, which will receive the Request object, so you can determine access to the OpenHandler storage.
## Twig Integration
Laravel Debugbar comes with two Twig Extensions. These are tested with [rcrowe/TwigBridge](https://github.com/rcrowe/TwigBridge) 0.6.x
Add the following extensions to your TwigBridge config/extensions.php (or register the extensions manually)
```php
'Barryvdh\Debugbar\Twig\Extension\Debug',
'Barryvdh\Debugbar\Twig\Extension\Dump',
'Barryvdh\Debugbar\Twig\Extension\Stopwatch',
```
The Dump extension will replace the [dump function](http://twig.sensiolabs.org/doc/functions/dump.html) to output variables using the DataFormatter. The Debug extension adds a `debug()` function which passes variables to the Message Collector,
instead of showing it directly in the template. It dumps the arguments, or when empty; all context variables.
```twig
{{ debug() }}
{{ debug(user, categories) }}
```
The Stopwatch extension adds a [stopwatch tag](http://symfony.com/blog/new-in-symfony-2-4-a-stopwatch-tag-for-twig) similar to the one in Symfony/Silex Twigbridge.
```twig
{% stopwatch "foo" %}
…some things that gets timed
{% endstopwatch %}
```

How it Works

Getting started with NFC Pay is simple and quick. Register your account, add your cards, and you're ready to make payments in no time. Whether you're paying at a store, sending money to a friend, or managing your merchant transactions, NFC Pay makes it easy and secure.
Download the NFC Pay app and sign up with your email or phone number. Complete the registration process by verifying your identity, and set up your secure PIN to protect your account.
Link your debit or credit cards to your NFC Pay wallet. Simply scan your card or enter the details manually, and you’re set to load funds, shop, and pay with ease.
To pay, simply tap your phone or scan the QR code at checkout. You can also transfer money to other users with a few taps. Enjoy fast, contactless payments with top-notch security.

Security System
NFC Pay prioritizes your security with advanced features that safeguard every transaction. From SMS or email verification to end-to-end encryption, we've implemented robust measures to ensure your data is always protected. Our security systems are designed to prevent unauthorized access and provide you with a safe and reliable payment experience.

Receive instant alerts for every transaction to keep track of your account activities.
Verify your identity through our Know Your Customer process to prevent fraud and enhance security.

Dramatically supply transparent backward deliverables before caward comp internal or "organic" sources.

All your data and transactions are encrypted, ensuring that your sensitive information remains private.

Monitor unusual activity patterns to detect and prevent suspicious behavior in real-time.
Why Choice Us
With NFC Pay, you get a trusted platform backed by proven expertise and a commitment to quality. We put our customers first, offering innovative solutions tailored to your needs, ensuring every transaction is secure, swift, and seamless.
Our team brings years of experience in the digital payments industry to provide reliable services.
We prioritize excellence, ensuring that every aspect of our platform meets the highest standards.
Your needs drive our solutions, and we are dedicated to delivering a superior user experience.
We continuously evolve, integrating the latest technologies to enhance your payment experience.
Testimonial Section
Hear from our users who trust NFC Pay for their everyday transactions. Our commitment to security, ease of use, and exceptional service shines through in their experiences. See why our clients choose NFC Pay for their payment needs and how it has transformed the way they manage their finances.
"NFC Pay has made my transactions incredibly simple and secure. The intuitive interface and quick payment options are game-changers for my business"
"I love how NFC Pay prioritizes security without compromising on convenience. The two-factor authentication and instant alerts give me peace of mind every time I use it."
"Setting up my merchant account was a breeze, and now I can accept payments effortlessly. NFC Pay has truly streamlined my operations, saving me time and hassle."
App Section
Unlock the full potential of NFC Pay by downloading our app, designed to bring secure, swift, and smart transactions to your fingertips. Whether you're paying at a store, transferring money to friends, or managing your business payments, the NFC Pay app makes it effortless. Available on both iOS and Android, it's your all-in-one solution for convenient and reliable digital payments. Download now and experience the future of payments!