Proven Expertise
Our team brings years of experience in the digital payments industry to provide reliable services.
<?php

return [

    /*
     |--------------------------------------------------------------------------
     | Debugbar Settings
     |--------------------------------------------------------------------------
     |
     | Debugbar is enabled by default, when debug is set to true in app.php.
     | You can override the value by setting enable to true or false instead of null.
     |
     | You can provide an array of URI's that must be ignored (eg. 'api/*')
     |
     */

    'enabled' => env('DEBUGBAR_ENABLED', null),
    'except' => [
        'telescope*',
        'horizon*',
    ],

    /*
     |--------------------------------------------------------------------------
     | Storage settings
     |--------------------------------------------------------------------------
     |
     | DebugBar stores data for session/ajax requests.
     | You can disable this, so the debugbar stores data in headers/session,
     | but this can cause problems with large data collectors.
     | By default, file storage (in the storage folder) is used. Redis and PDO
     | can also be used. For PDO, run the package migrations first.
     |
     | Warning: Enabling storage.open will allow everyone to access previous
     | request, do not enable open storage in publicly available environments!
     | Specify a callback if you want to limit based on IP or authentication.
     */
    'storage' => [
        'enabled'    => true,
        'open'       => env('DEBUGBAR_OPEN_STORAGE', false), // bool/callback.
        'driver'     => 'file', // redis, file, pdo, socket, custom
        'path'       => storage_path('debugbar'), // For file driver
        'connection' => null,   // Leave null for default connection (Redis/PDO)
        'provider'   => '', // Instance of StorageInterface for custom driver
        'hostname'   => '127.0.0.1', // Hostname to use with the "socket" driver
        'port'       => 2304, // Port to use with the "socket" driver
    ],

    /*
    |--------------------------------------------------------------------------
    | Editor
    |--------------------------------------------------------------------------
    |
    | Choose your preferred editor to use when clicking file name.
    |
    | Supported: "phpstorm", "vscode", "vscode-insiders", "vscode-remote",
    |            "vscode-insiders-remote", "vscodium", "textmate", "emacs",
    |            "sublime", "atom", "nova", "macvim", "idea", "netbeans",
    |            "xdebug", "espresso"
    |
    */

    'editor' => env('DEBUGBAR_EDITOR') ?: env('IGNITION_EDITOR', 'phpstorm'),

    /*
    |--------------------------------------------------------------------------
    | Remote Path Mapping
    |--------------------------------------------------------------------------
    |
    | If you are using a remote dev server, like Laravel Homestead, Docker, or
    | even a remote VPS, it will be necessary to specify your path mapping.
    |
    | Leaving one, or both of these, empty or null will not trigger the remote
    | URL changes and Debugbar will treat your editor links as local files.
    |
    | "remote_sites_path" is an absolute base path for your sites or projects
    | in Homestead, Vagrant, Docker, or another remote development server.
    |
    | Example value: "/home/vagrant/Code"
    |
    | "local_sites_path" is an absolute base path for your sites or projects
    | on your local computer where your IDE or code editor is running on.
    |
    | Example values: "/Users/<name>/Code", "C:\Users\<name>\Documents\Code"
    |
    */

    'remote_sites_path' => env('DEBUGBAR_REMOTE_SITES_PATH'),
    'local_sites_path' => env('DEBUGBAR_LOCAL_SITES_PATH', env('IGNITION_LOCAL_SITES_PATH')),

    /*
     |--------------------------------------------------------------------------
     | Vendors
     |--------------------------------------------------------------------------
     |
     | Vendor files are included by default, but can be set to false.
     | This can also be set to 'js' or 'css', to only include javascript or css vendor files.
     | Vendor files are for css: font-awesome (including fonts) and highlight.js (css files)
     | and for js: jquery and highlight.js
     | So if you want syntax highlighting, set it to true.
     | jQuery is set to not conflict with existing jQuery scripts.
     |
     */

    'include_vendors' => true,

    /*
     |--------------------------------------------------------------------------
     | Capture Ajax Requests
     |--------------------------------------------------------------------------
     |
     | The Debugbar can capture Ajax requests and display them. If you don't want this (ie. because of errors),
     | you can use this option to disable sending the data through the headers.
     |
     | Optionally, you can also send ServerTiming headers on ajax requests for the Chrome DevTools.
     |
     | Note for your request to be identified as ajax requests they must either send the header
     | X-Requested-With with the value XMLHttpRequest (most JS libraries send this), or have application/json as a Accept header.
     |
     | By default `ajax_handler_auto_show` is set to true allowing ajax requests to be shown automatically in the Debugbar.
     | Changing `ajax_handler_auto_show` to false will prevent the Debugbar from reloading.
     */

    'capture_ajax' => true,
    'add_ajax_timing' => false,
    'ajax_handler_auto_show' => true,

    /*
     |--------------------------------------------------------------------------
     | Custom Error Handler for Deprecated warnings
     |--------------------------------------------------------------------------
     |
     | When enabled, the Debugbar shows deprecated warnings for Symfony components
     | in the Messages tab.
     |
     */
    'error_handler' => false,

    /*
     |--------------------------------------------------------------------------
     | Clockwork integration
     |--------------------------------------------------------------------------
     |
     | The Debugbar can emulate the Clockwork headers, so you can use the Chrome
     | Extension, without the server-side code. It uses Debugbar collectors instead.
     |
     */
    'clockwork' => false,

    /*
     |--------------------------------------------------------------------------
     | DataCollectors
     |--------------------------------------------------------------------------
     |
     | Enable/disable DataCollectors
     |
     */

    'collectors' => [
        'phpinfo'         => true,  // Php version
        'messages'        => true,  // Messages
        'time'            => true,  // Time Datalogger
        'memory'          => true,  // Memory usage
        'exceptions'      => true,  // Exception displayer
        'log'             => true,  // Logs from Monolog (merged in messages if enabled)
        'db'              => true,  // Show database (PDO) queries and bindings
        'views'           => true,  // Views with their data
        'route'           => true,  // Current route information
        'auth'            => false, // Display Laravel authentication status
        'gate'            => true,  // Display Laravel Gate checks
        'session'         => true,  // Display session data
        'symfony_request' => true,  // Only one can be enabled..
        'mail'            => true,  // Catch mail messages
        'laravel'         => false, // Laravel version and environment
        'events'          => false, // All events fired
        'default_request' => false, // Regular or special Symfony request logger
        'logs'            => false, // Add the latest log messages
        'files'           => false, // Show the included files
        'config'          => false, // Display config settings
        'cache'           => false, // Display cache events
        'models'          => true,  // Display models
        'livewire'        => true,  // Display Livewire (when available)
        'jobs'            => false, // Display dispatched jobs
    ],

    /*
     |--------------------------------------------------------------------------
     | Extra options
     |--------------------------------------------------------------------------
     |
     | Configure some DataCollectors
     |
     */

    'options' => [
        'time' => [
            'memory_usage' => false,  // Calculated by subtracting memory start and end, it may be inaccurate
        ],
        'messages' => [
            'trace' => true,   // Trace the origin of the debug message
        ],
        'memory' => [
            'reset_peak' => false,     // run memory_reset_peak_usage before collecting
            'with_baseline' => false,  // Set boot memory usage as memory peak baseline
            'precision' => 0,          // Memory rounding precision
        ],
        'auth' => [
            'show_name' => true,   // Also show the users name/email in the debugbar
        ],
        'db' => [
            'with_params'       => true,   // Render SQL with the parameters substituted
            'backtrace'         => true,   // Use a backtrace to find the origin of the query in your files.
            'backtrace_exclude_paths' => [],   // Paths to exclude from backtrace. (in addition to defaults)
            'timeline'          => false,  // Add the queries to the timeline
            'duration_background'  => true,   // Show shaded background on each query relative to how long it took to execute.
            'explain' => [                 // Show EXPLAIN output on queries
                'enabled' => false,
                'types' => ['SELECT'],     // Deprecated setting, is always only SELECT
            ],
            'hints'             => false,    // Show hints for common mistakes
            'show_copy'         => false,    // Show copy button next to the query,
            'slow_threshold'    => false,   // Only track queries that last longer than this time in ms
            'memory_usage'      => false,   // Show queries memory usage
            'soft_limit'       => 100,      // After the soft limit, no parameters/backtrace are captured
            'hard_limit'       => 500,      // After the hard limit, queries are ignored
        ],
        'mail' => [
            'timeline' => false,  // Add mails to the timeline
            'show_body' => true,
        ],
        'views' => [
            'timeline' => false,    // Add the views to the timeline (Experimental)
            'data' => false,        //true for all data, 'keys' for only names, false for no parameters.
            'group' => 50,          // Group duplicate views. Pass value to auto-group, or true/false to force
            'exclude_paths' => [    // Add the paths which you don't want to appear in the views
                'vendor/filament'   // Exclude Filament components by default
            ],
        ],
        'route' => [
            'label' => true,  // show complete route on bar
        ],
        'session' => [
            'hiddens' => [], // hides sensitive values using array paths
        ],
        'symfony_request' => [
            'hiddens' => [], // hides sensitive values using array paths, example: request_request.password
        ],
        'events' => [
            'data' => false, // collect events data, listeners
        ],
        'logs' => [
            'file' => null,
        ],
        'cache' => [
            'values' => true, // collect cache values
        ],
    ],

    /*
     |--------------------------------------------------------------------------
     | Inject Debugbar in Response
     |--------------------------------------------------------------------------
     |
     | Usually, the debugbar is added just before </body>, by listening to the
     | Response after the App is done. If you disable this, you have to add them
     | in your template yourself. See http://phpdebugbar.com/docs/rendering.html
     |
     */

    'inject' => true,

    /*
     |--------------------------------------------------------------------------
     | DebugBar route prefix
     |--------------------------------------------------------------------------
     |
     | Sometimes you want to set route prefix to be used by DebugBar to load
     | its resources from. Usually the need comes from misconfigured web server or
     | from trying to overcome bugs like this: http://trac.nginx.org/nginx/ticket/97
     |
     */
    'route_prefix' => '_debugbar',

    /*
     |--------------------------------------------------------------------------
     | DebugBar route middleware
     |--------------------------------------------------------------------------
     |
     | Additional middleware to run on the Debugbar routes
     */
    'route_middleware' => [],

    /*
     |--------------------------------------------------------------------------
     | DebugBar route domain
     |--------------------------------------------------------------------------
     |
     | By default DebugBar route served from the same domain that request served.
     | To override default domain, specify it as a non-empty value.
     */
    'route_domain' => null,

    /*
     |--------------------------------------------------------------------------
     | DebugBar theme
     |--------------------------------------------------------------------------
     |
     | Switches between light and dark theme. If set to auto it will respect system preferences
     | Possible values: auto, light, dark
     */
    'theme' => env('DEBUGBAR_THEME', 'auto'),

    /*
     |--------------------------------------------------------------------------
     | Backtrace stack limit
     |--------------------------------------------------------------------------
     |
     | By default, the DebugBar limits the number of frames returned by the 'debug_backtrace()' function.
     | If you need larger stacktraces, you can increase this number. Setting it to 0 will result in no limit.
     */
    'debug_backtrace_limit' => 50,
];

How it Works

Getting started with NFC Pay is simple and quick. Register your account, add your cards, and you're ready to make payments in no time. Whether you're paying at a store, sending money to a friend, or managing your merchant transactions, NFC Pay makes it easy and secure.
Download the NFC Pay app and sign up with your email or phone number. Complete the registration process by verifying your identity, and set up your secure PIN to protect your account.
Link your debit or credit cards to your NFC Pay wallet. Simply scan your card or enter the details manually, and you’re set to load funds, shop, and pay with ease.
To pay, simply tap your phone or scan the QR code at checkout. You can also transfer money to other users with a few taps. Enjoy fast, contactless payments with top-notch security.

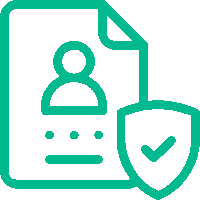
Security System
NFC Pay prioritizes your security with advanced features that safeguard every transaction. From SMS or email verification to end-to-end encryption, we've implemented robust measures to ensure your data is always protected. Our security systems are designed to prevent unauthorized access and provide you with a safe and reliable payment experience.

Receive instant alerts for every transaction to keep track of your account activities.
Verify your identity through our Know Your Customer process to prevent fraud and enhance security.

Dramatically supply transparent backward deliverables before caward comp internal or "organic" sources.

All your data and transactions are encrypted, ensuring that your sensitive information remains private.

Monitor unusual activity patterns to detect and prevent suspicious behavior in real-time.
Why Choice Us
With NFC Pay, you get a trusted platform backed by proven expertise and a commitment to quality. We put our customers first, offering innovative solutions tailored to your needs, ensuring every transaction is secure, swift, and seamless.
Our team brings years of experience in the digital payments industry to provide reliable services.
We prioritize excellence, ensuring that every aspect of our platform meets the highest standards.
Your needs drive our solutions, and we are dedicated to delivering a superior user experience.
We continuously evolve, integrating the latest technologies to enhance your payment experience.
Testimonial Section
Hear from our users who trust NFC Pay for their everyday transactions. Our commitment to security, ease of use, and exceptional service shines through in their experiences. See why our clients choose NFC Pay for their payment needs and how it has transformed the way they manage their finances.
"NFC Pay has made my transactions incredibly simple and secure. The intuitive interface and quick payment options are game-changers for my business"
"I love how NFC Pay prioritizes security without compromising on convenience. The two-factor authentication and instant alerts give me peace of mind every time I use it."
"Setting up my merchant account was a breeze, and now I can accept payments effortlessly. NFC Pay has truly streamlined my operations, saving me time and hassle."
App Section
Unlock the full potential of NFC Pay by downloading our app, designed to bring secure, swift, and smart transactions to your fingertips. Whether you're paying at a store, transferring money to friends, or managing your business payments, the NFC Pay app makes it effortless. Available on both iOS and Android, it's your all-in-one solution for convenient and reliable digital payments. Download now and experience the future of payments!