## Debugbar for Laravel

[](http://choosealicense.com/licenses/mit/)
[](https://packagist.org/packages/barryvdh/laravel-debugbar)
[](https://packagist.org/packages/barryvdh/laravel-debugbar)
[](https://fruitcake.nl/)
This is a package to integrate [PHP Debug Bar](http://phpdebugbar.com/) with Laravel.
It includes a ServiceProvider to register the debugbar and attach it to the output. You can publish assets and configure it through Laravel.
It bootstraps some Collectors to work with Laravel and implements a couple custom DataCollectors, specific for Laravel.
It is configured to display Redirects and (jQuery) Ajax Requests. (Shown in a dropdown)
Read [the documentation](http://phpdebugbar.com/docs/) for more configuration options.
### Note: Use the DebugBar only in development. Do not use Debugbar on publicly accessible websites, as it will leak information from stored requests (by design). It can also slow the application down (because it has to gather data). So when experiencing slowness, try disabling some of the collectors.
This package includes some custom collectors:
- QueryCollector: Show all queries, including binding + timing
- RouteCollector: Show information about the current Route.
- ViewCollector: Show the currently loaded views. (Optionally: display the shared data)
- EventsCollector: Show all events
- LaravelCollector: Show the Laravel version and Environment. (disabled by default)
- SymfonyRequestCollector: replaces the RequestCollector with more information about the request/response
- LogsCollector: Show the latest log entries from the storage logs. (disabled by default)
- FilesCollector: Show the files that are included/required by PHP. (disabled by default)
- ConfigCollector: Display the values from the config files. (disabled by default)
- CacheCollector: Display all cache events. (disabled by default)
Bootstraps the following collectors for Laravel:
- LogCollector: Show all Log messages
- SymfonyMailCollector for Mail
And the default collectors:
- PhpInfoCollector
- MessagesCollector
- TimeDataCollector (With Booting and Application timing)
- MemoryCollector
- ExceptionsCollector
It also provides a facade interface (`Debugbar`) for easy logging Messages, Exceptions and Time
## Installation
Require this package with composer. It is recommended to only require the package for development.
```shell
composer require barryvdh/laravel-debugbar --dev
```
Laravel uses Package Auto-Discovery, so doesn't require you to manually add the ServiceProvider.
The Debugbar will be enabled when `APP_DEBUG` is `true`.
> If you use a catch-all/fallback route, make sure you load the Debugbar ServiceProvider before your own App ServiceProviders.
### Laravel without auto-discovery:
If you don't use auto-discovery, add the ServiceProvider to the providers array in config/app.php
```php
Barryvdh\Debugbar\ServiceProvider::class,
```
If you want to use the facade to log messages, add this to your facades in app.php:
```php
'Debugbar' => Barryvdh\Debugbar\Facades\Debugbar::class,
```
The profiler is enabled by default, if you have APP_DEBUG=true. You can override that in the config (`debugbar.enabled`) or by setting `DEBUGBAR_ENABLED` in your `.env`. See more options in `config/debugbar.php`
You can also set in your config if you want to include/exclude the vendor files also (FontAwesome, Highlight.js and jQuery). If you already use them in your site, set it to false.
You can also only display the js or css vendors, by setting it to 'js' or 'css'. (Highlight.js requires both css + js, so set to `true` for syntax highlighting)
#### Copy the package config to your local config with the publish command:
```shell
php artisan vendor:publish --provider="Barryvdh\Debugbar\ServiceProvider"
```
### Laravel with Octane:
Make sure to add LaravelDebugbar to your flush list in `config/octane.php`.
```php
'flush' => [
\Barryvdh\Debugbar\LaravelDebugbar::class,
],
```
### Lumen:
For Lumen, register a different Provider in `bootstrap/app.php`:
```php
if (env('APP_DEBUG')) {
$app->register(Barryvdh\Debugbar\LumenServiceProvider::class);
}
```
To change the configuration, copy the file to your config folder and enable it:
```php
$app->configure('debugbar');
```
## Usage
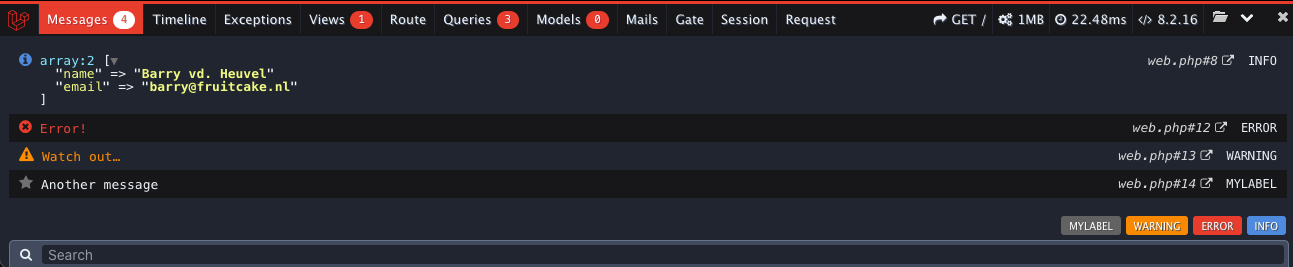
You can now add messages using the Facade (when added), using the PSR-3 levels (debug, info, notice, warning, error, critical, alert, emergency):
```php
Debugbar::info($object);
Debugbar::error('Error!');
Debugbar::warning('Watch out…');
Debugbar::addMessage('Another message', 'mylabel');
```
And start/stop timing:
```php
Debugbar::startMeasure('render','Time for rendering');
Debugbar::stopMeasure('render');
Debugbar::addMeasure('now', LARAVEL_START, microtime(true));
Debugbar::measure('My long operation', function() {
// Do something…
});
```
Or log exceptions:
```php
try {
throw new Exception('foobar');
} catch (Exception $e) {
Debugbar::addThrowable($e);
}
```
There are also helper functions available for the most common calls:
```php
// All arguments will be dumped as a debug message
debug($var1, $someString, $intValue, $object);
// `$collection->debug()` will return the collection and dump it as a debug message. Like `$collection->dump()`
collect([$var1, $someString])->debug();
start_measure('render','Time for rendering');
stop_measure('render');
add_measure('now', LARAVEL_START, microtime(true));
measure('My long operation', function() {
// Do something…
});
```
If you want you can add your own DataCollectors, through the Container or the Facade:
```php
Debugbar::addCollector(new DebugBar\DataCollector\MessagesCollector('my_messages'));
//Or via the App container:
$debugbar = App::make('debugbar');
$debugbar->addCollector(new DebugBar\DataCollector\MessagesCollector('my_messages'));
```
By default, the Debugbar is injected just before `</body>`. If you want to inject the Debugbar yourself,
set the config option 'inject' to false and use the renderer yourself and follow http://phpdebugbar.com/docs/rendering.html
```php
$renderer = Debugbar::getJavascriptRenderer();
```
Note: Not using the auto-inject, will disable the Request information, because that is added After the response.
You can add the default_request datacollector in the config as alternative.
## Enabling/Disabling on run time
You can enable or disable the debugbar during run time.
```php
\Debugbar::enable();
\Debugbar::disable();
```
NB. Once enabled, the collectors are added (and could produce extra overhead), so if you want to use the debugbar in production, disable in the config and only enable when needed.
## Storage
Debugbar remembers previous requests, which you can view using the Browse button on the right. This will only work if you enable `debugbar.storage.open` in the config.
Make sure you only do this on local development, because otherwise other people will be able to view previous requests.
In general, Debugbar should only be used locally or at least restricted by IP.
It's possible to pass a callback, which will receive the Request object, so you can determine access to the OpenHandler storage.
## Twig Integration
Laravel Debugbar comes with two Twig Extensions. These are tested with [rcrowe/TwigBridge](https://github.com/rcrowe/TwigBridge) 0.6.x
Add the following extensions to your TwigBridge config/extensions.php (or register the extensions manually)
```php
'Barryvdh\Debugbar\Twig\Extension\Debug',
'Barryvdh\Debugbar\Twig\Extension\Dump',
'Barryvdh\Debugbar\Twig\Extension\Stopwatch',
```
The Dump extension will replace the [dump function](http://twig.sensiolabs.org/doc/functions/dump.html) to output variables using the DataFormatter. The Debug extension adds a `debug()` function which passes variables to the Message Collector,
instead of showing it directly in the template. It dumps the arguments, or when empty; all context variables.
```twig
{{ debug() }}
{{ debug(user, categories) }}
```
The Stopwatch extension adds a [stopwatch tag](http://symfony.com/blog/new-in-symfony-2-4-a-stopwatch-tag-for-twig) similar to the one in Symfony/Silex Twigbridge.
```twig
{% stopwatch "foo" %}
…some things that gets timed
{% endstopwatch %}
```
Enhancing Payment Security: The Role of Encryption and Tokenization in Digital Transactions
As digital transactions proliferate, ensuring robust payment security is more critical than ever. Two foundational technologies that are pivotal in this effort are encryption and tokenization. Encryption is a process that transforms data into a secure format, known as ciphertext, which can only be deciphered using a specific decryption key. This means that even if data is intercepted during transmission, it remains unreadable and protected from unauthorized access. Encryption is essential in safeguarding sensitive payment information, such as credit card details and personal data, during online transactions. Tokenization, on the other hand, involves substituting sensitive data with unique identifiers or "tokens." These tokens serve as placeholders and have no value outside of the specific transaction context. If intercepted, tokens are meaningless and cannot be used to access the original sensitive data. This method significantly reduces the risk of fraud and data breaches, as the actual payment information is not stored or transmitted. Together, encryption and tokenization form a powerful security framework. Encryption ensures that data is protected during transmission, while tokenization minimizes the risk of exposing sensitive information by replacing it with secure, non-sensitive tokens. These technologies are integral to modern payment platforms, providing a robust defense against cyber threats. By implementing advanced encryption and tokenization techniques, businesses can enhance the security of digital transactions, ensuring that users' financial and personal information remains safe. This comprehensive approach not only builds user trust but also fortifies the overall security infrastructure of digital payment systems. As cyber threats evolve, the continued advancement of encryption and tokenization will be crucial in maintaining secure and reliable payment processes.
In the digital age, privacy concerns have become increasingly paramount, prompting the European Union to enact the General Data Protection Regulation (GDPR) in 2018. Among its many provisions, GDPR sets strict guidelines for the collection and processing of personal data, including the use of cookies on websites. Privacy Policy